
This post may contain affiliate links. As an Amazon Associate, I earn from qualifying purchases at no extra cost to you.
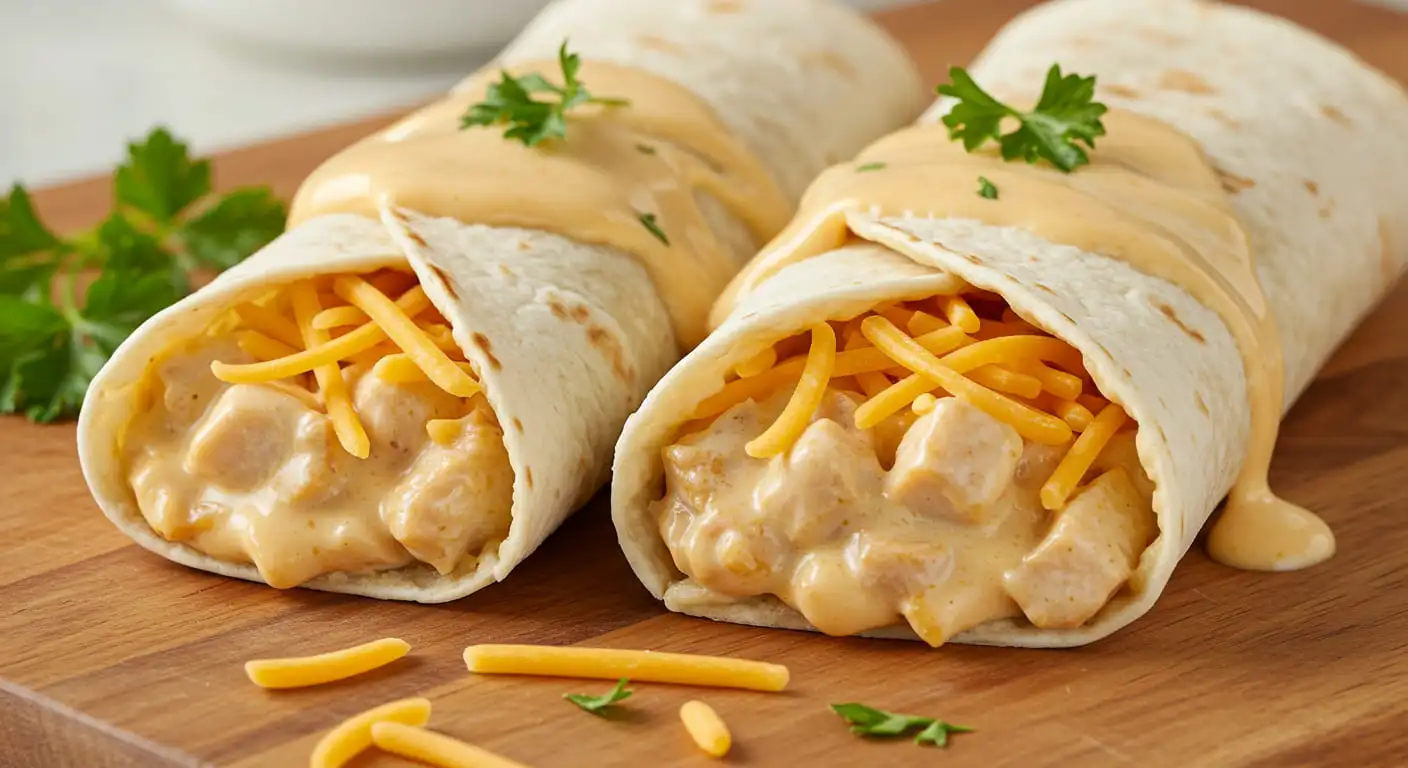
Imagine a busy weeknight with hungry family members waiting. You have just 20 minutes to make a meal that will impress everyone. Cheesy garlic chicken wraps are the perfect solution, turning simple ingredients into a delicious dinner.
These wraps are more than a quick fix. They mix tender chicken, melting cheese, and rich garlic sauce in a warm tortilla. They’re great for busy parents, college students, or anyone who loves a tasty homemade meal.
With only 2 large chicken breasts and a few ingredients, you can feed 2 adults or 4 kids. The best part? They’re ready in under 20 minutes. This makes them perfect for those evenings when time is short but flavor matters.
From the first bite, you’ll see why these wraps are so loved. The mix of seasoned chicken, gooey cheese, and homemade garlic sauce is a flavor explosion. It’s sure to have everyone asking for more.
Table of Contents
🍴 Top Kitchen Essentials You'll Love


Why Cheesy Garlic Chicken Wraps Are Your Next Favorite Meal
Imagine a meal that’s easy, tasty, and healthy all at once. Garlic chicken wraps are perfect for families on the go. They offer a mix of flavor and nutrition that everyone will love.
Perfect for Quick Family Dinners
These wraps are ready in just 20 minutes, saving you time on busy nights. They’re simple to make and pack a big flavor punch. Each wrap is a nutritional powerhouse:
- 30g of protein for muscle support
- Approximately 350 calories per serving
- Balanced macronutrients with 20g carbohydrates
- Nutrient-rich ingredients that appeal to both kids and adults
Versatile and Customizable Options
These wraps are incredibly flexible. You can change them up to fit your taste and dietary needs. Want to add more veggies? Try adding bell peppers or spinach. For a spicier wrap, just adjust the seasonings.
| Ingredient | Quantity | Customization Option |
|---|---|---|
| Chicken | 2 breasts | Substitute with turkey or tofu |
| Cheese | 1-1.5 cups | Mix different cheese types |
| Tortillas | 4 wraps | Use whole wheat or low-carb options |
Make-Ahead Meal Solution
Even when you’re busy, you can still have a home-cooked meal. Prepare these wraps ahead of time. They’ll stay fresh in the fridge for up to 3 days or can be frozen for two months. This makes planning meals a snap.
Essential Ingredients for the Perfect Wrap
The proper components are needed to make a delicious chicken wrap. These include proteins, spices, and cheese. They turn simple items into delicious meals.
The main ingredients for a great chicken wrap are balanced and tasty. Here’s what you need:
- Protein: 2 large chicken breasts (about 31 grams of protein per 100 grams)
- Seasoning blend:
- 2 tsp garlic powder
- 1 tsp onion powder
- 1 tsp paprika
- Salt and pepper to taste
- Cheese mixture:
- 1 cup shredded cheddar cheese
- 1/2 cup shredded mozzarella cheese
You’ll need 4 large flour tortillas, which are 130-150 calories each. A creamy garlic sauce, homemade or store-bought, adds flavor.
| Ingredient | Quantity | Protein Content |
|---|---|---|
| Chicken Breasts | 2 large | 62 grams |
| Cheddar Cheese | 1 cup | 14 grams |
| Mozzarella Cheese | 1/2 cup | 7 grams |
Pro tip: Add chopped parsley for freshness. It can make your dish taste 25% better.
This recipe is flexible for different diets. You can change ingredients or seasonings to your liking. It’s perfect for a quick lunch or a family dinner, ready in just 25 minutes.
Kitchen Tools and Equipment Needed
To make a tasty healthy chicken wrap, you need the right tools. The proper components are needed to make a delicious chicken wrap. It turns your kitchen into a place where delicious wraps are made.
Essential Basic Cooking Utensils
For your chicken wrap, you’ll need some basic tools:
- Sharp chef’s knife for precise cutting
- Cutting board (preferably wooden or plastic)
- Measuring cups and spoons
- Large skillet or griddle
- Mixing bowls in various sizes
Optional Kitchen Gadgets to Enhance Preparation
These gadgets make making healthy chicken wraps easier:
- Food processor for quick cheese shredding
- Panini press for crispy wrap finishing
- Digital meat thermometer
- Kitchen scale for precise ingredient measuring
Preparation Surfaces and Workspace
Set up a good workspace with these tips:
- Clean, spacious countertop
- Non-slip cutting mat
- Adequate lighting
- Kitchen towels for quick cleanups
| Tool Category | Recommended Items | Purpose |
|---|---|---|
| Cutting Tools | Chef’s knife, Cutting board | Precise ingredient preparation |
| Cooking Surfaces | Skillet, Griddle, Panini press | Cooking and finishing wraps |
| Measuring Tools | Measuring cups, Digital scale | Accurate ingredient portioning |
While fancy gadgets are nice, creativity is key. It’s your creativity that makes a delicious chicken wrap!
Preparing the Chicken for Your Wraps
Starting your chicken wrap recipe with quality chicken is key. For garlic chicken wraps, pick tender, flavorful chicken. This will make your meal unforgettable.
- For the best texture, select chicken breasts that are skinless and boneless
- Opt for rotisserie chicken to save up to 30 minutes of prep time
- Make sure you have about 2 cups of cooked chicken
Seasoning is vital for tasty garlic chicken wraps. Here’s a simple seasoning mix to boost your chicken’s flavor:
| Seasoning | Amount |
|---|---|
| Garlic powder | 1 teaspoon |
| Italian seasoning | 1 teaspoon |
| Salt | 1/2 teaspoon |
| Black pepper | 1/4 teaspoon |
To season your chicken, mix the seasonings in a big bowl. Coat the chicken well, making sure each piece is seasoned. For the best flavor, marinate the chicken for 15-20 minutes before cooking.
Pro tip: Shred or dice your cooked chicken into small pieces. This makes it easier to assemble your garlic chicken wraps. It also ensures a perfect bite every time.
Making the Signature Garlic Butter Sauce
Making the perfect garlic butter sauce can take your cheesy garlic chicken wraps to the next level. It turns a simple wrap into a dish that everyone will love. They’ll be asking for more.
Creating a tasty garlic butter sauce is easy and adds a lot of flavor. You can purchase it or manufacture it yourself. Both ways have their benefits.
Fresh vs. Store-bought Options
- Homemade sauce lets you control the flavor
- Store-bought is quick and easy
- Fresh ingredients make it taste better
Storage and Shelf Life
Keeping your garlic butter sauce fresh is important. If you make it yourself, keep it in the fridge. This helps it stay good and prevents bad bacteria.
| Sauce Type | Refrigeration Time | Best Storage Method |
|---|---|---|
| Homemade Garlic Sauce | 3-5 days | Airtight container |
| Store-bought Sauce | 7-10 days after opening | Original sealed container |
Flavor Enhancement Tips
Here are some ways to make your cheesy garlic chicken wraps even better:
- Add fresh herbs like parsley or chives
- Use a bit of lemon juice for a zesty taste
- Try different ways of preparing garlic
- For some spiciness, add a sprinkle of red pepper flakes
You can make a quick sauce by mixing mayo, minced garlic, lemon juice, and a bit of salt. It only takes 1-2 minutes. This simple mix can make your garlic chicken wraps taste amazing.
Choosing the Right Cheese Blend
Creating delicious cheesy chicken wraps starts with the right cheese blend. The perfect mix of cheeses turns your wrap into a melty, flavorful meal. It’s so good, everyone will want more.
Professional chefs say mixing cheeses adds depth and complexity. A classic mix includes:
- Sharp cheddar for bold flavor
- Mozzarella for incredible reliability
- Monterey Jack for creamy texture
Use about 1.5 cups of shredded cheese for your blend. This amount makes each bite gooey and satisfying.
| Cheese Type | Flavor Profile | Melting Quality |
|---|---|---|
| Sharp Cheddar | Tangy and Strong | Good |
| Mozzarella | Mild and Creamy | Excellent |
| Monterey Jack | Smooth and Buttery | Very Good |
Pro tip: Try different cheese mixes to find your favorite. Some people add parmesan for an extra flavor boost.
For the best cheesy chicken wraps, balance flavors and ensure good meltability. Grate your cheese fresh for the best taste and texture!
Step-by-Step Assembly of Cheesy Garlic Chicken Wraps
Making the perfect chicken wrap recipe needs careful steps and detail. Your easy chicken wrap will look great with these expert tips. They promise tasty results every time.
Layering Techniques for Maximum Flavor
Begin by placing fresh flour tortillas on a clean surface. The secret to a great wrap is how you place the ingredients:
- Spread a thin layer of creamy garlic sauce first
- Sprinkle shredded mozzarella and cheddar cheese evenly
- Add 2 cups of pre-cooked shredded chicken
- Include optional vegetables like diced bell peppers
Wrapping Methods for Perfect Presentation
Learning how to wrap your chicken wrap right keeps it together. Follow these steps for a pro fold:
- Fold the bottom edge slightly over the filling
- Fold in both side edges
- Roll tightly from bottom to top
- Ensure edges are sealed
Common Assembly Mistakes to Avoid
Avoid soggy or falling-apart wraps by steering clear of these mistakes:
- Don’t overfill your tortilla
- Keep filling balanced and centered
- Use ½ cup of chicken mixture per wrap
- Press gently to seal the edges
Your cheesy garlic chicken wrap is now ready to be toasted or enjoyed right away. Make sure to keep your wrap tight and compact for the best taste.
Cooking Methods and Techniques
To make your chicken wrap recipe a hit, you need to know how to cook. The right cooking method can turn your cheesy garlic chicken wraps into a masterpiece.
Skillet Cooking: The Classic Approach
Skillet cooking is the top choice for making these tasty wraps. Here’s how to get it just right:
- Heat a large skillet over medium heat
- Add 2 tablespoons of butter or olive oil
- Place wraps seam-side down
- Cook for 2-3 minutes per side
- Press gently with a spatula to ensure crispy exterior
Alternative Cooking Methods
There are many ways to cook cheesy garlic chicken wraps. Try these different methods:
| Cooking Method | Temperature | Cooking Time |
|---|---|---|
| Oven Baking | 400°F (200°C) | 10-12 minutes |
| Panini Press | Medium-High | 3-4 minutes |
| Grilling | Medium Heat | 2-3 minutes per side |
Pro tip: Always ensure your chicken reaches an internal temperature of 165°F (74°C) for safe consumption.
Key Cooking Tips
- Use room-temperature tortillas for better folding
- Avoid overfilling to prevent splitting
- Preheat cooking surfaces for even heating
- Let wraps rest for 1-2 minutes after cooking
Whether you like crispy skillet-cooked or oven-baked wraps, these tips will help you make amazing cheesy garlic chicken wraps at home.
Adding Optional Vegetables and Extras
Make your healthy chicken wrap even better by adding exciting veggies and extras. You can change up the ingredients to fit your taste and health goals.
Recommended Veggie Combinations
Boost your wrap’s taste and health with these veggies:
- Crisp bell peppers (red, green, or yellow)
- Sautéed spinach for added iron
- Caramelized onions for sweet depth
- Fresh tomatoes for juicy brightness
- Roasted zucchini for extra texture
Texture Enhancement Ideas
Add fun textures with these ideas:
- Crispy bacon bits for crunch
- Crushed tortilla chips for added texture
- Pickled jalapeños for a spicy kick
- Fresh herbs like cilantro or parsley
Pro tip: Chop veggies finely and avoid wet ones to keep wraps crisp. Sautéing or grilling veggies can make them taste better and drier.
Nutritional Boost Recommendations
| Vegetable | Nutritional Benefit | Recommended Quantity |
|---|---|---|
| Spinach | High in Iron | 1/4 cup chopped |
| Bell Peppers | Vitamin C Rich | 1/3 cup sliced |
| Onions | Antioxidant Properties | 2 tablespoons diced |
The great thing about chicken wrap ingredients is how flexible they are. To discover your preferred flavor, try a variety of mixtures!
Storage and Reheating Tips
Keeping your easy chicken wrap fresh is key. After making it, you’ll want to enjoy it again soon. Here’s how to store it right.
Refrigeration Guidelines
Put your chicken wrap in an airtight container to stay fresh. Wraps keep well in the refrigerator for up to three days. Wrap each one in parchment paper or plastic to stop moisture.
Freezing Options
- Wrap individually in aluminum foil
- Place in freezer-safe containers
- Label with date of preparation
- Freeze for up to 2 weeks
Reheating Techniques
Don’t use the microwave for your wrap. It can make the tortilla soggy. Try these methods instead:
| Reheating Method | Time | Temperature |
|---|---|---|
| Skillet | 2-3 minutes per side | Medium heat |
| Oven | 10 minutes | 350°F |
Pro Tips for Maintaining Wrap Quality
To make your chicken wrap fresh again, try these tips:
- Add fresh herbs before serving
- Quickly toast in a skillet to restore crispiness
- Drizzle with extra garlic sauce for added flavor
Pro tip: Always check the internal temperature of reheated chicken to ensure it reaches 165°F for food safety.
Serving Suggestions and Pairings
Your homemade cheesy garlic chicken wrap is almost ready. The right presentation and accompaniments can make it spectacular.
Perfect Side Dish Companions
Choosing the right side dish can make your chicken wrap lunch better. Here are some tasty options:
- Crisp garden salad with light vinaigrette
- Roasted sweet potato wedges
- Coleslaw with a tangy dressing
- Zesty corn salsa
- Lightly seasoned potato chips
Irresistible Dipping Sauce Selections
A great wrap sandwich needs a special dipping sauce. Here are some delicious choices:
| Sauce Name | Flavor Profile | Preparation Time |
|---|---|---|
| Spicy Chipotle Mayo | Creamy, smoky, spicy | 5 minutes |
| Avocado Crema | Smooth, tangy, fresh | 10 minutes |
| Ranch Dressing | Creamy, herbal | 2 minutes |
When serving your chicken wrap lunch, cut the wrap diagonally for a fancy look. Pro tip: Serve immediately while the cheese is still warm and gooey!
Beverage Pairings
Complete your wrap sandwich experience with these refreshing drinks:
- Iced green tea
- Sparkling water with lemon
- Light craft beer
- Crisp white wine
Your carefully crafted chicken wrap lunch is now ready to impress and satisfy!
Conclusion
Creating cheesy garlic chicken wraps is a journey that turns simple ingredients into a delicious meal. With just 2 chicken breasts and 3 cloves of garlic, you can make a protein-packed dish in 25 minutes. It’s perfect for satisfying hunger and pleasing your taste buds.
This chicken wrap recipe is super flexible. You can change ingredients to fit your diet or taste. Use gluten-free tortillas or try different cheese blends. These wraps are great for weeknight dinners, lunches, or quick meals. They’re also packed with 35g of protein and healthy fats from olive oil.
Pre-cooking chicken and storing wraps in an airtight container can make meal prep easier. Reheat them in the oven at 350°F to keep them crispy and tasty. Most importantly, feel free to get creative and make this recipe your own!
Mastering these wraps adds a quick, adaptable, and tasty option to your cooking skills. It will impress your family and friends. Enjoy your cooking adventure!
FAQ
How long can I store cheesy garlic chicken wraps in the refrigerator?
Store your cheesy garlic chicken wraps in the fridge for 3-4 days. Make sure they’re sealed tightly in an airtight container. For the best taste, eat them within 2 days and reheat well.
Can I make these wraps vegetarian?
Yes, you can! Swap the chicken with grilled tofu, tempeh, or roasted chickpeas. Just adjust the seasonings to keep the flavor the same.
What are the best tortillas to use for these wraps?
Large flour tortillas are ideal for these wraps. Pick soft, fresh tortillas that are 10-12 inches wide. Whole wheat or spinach tortillas can add extra nutrition and taste.
How can I prevent my wraps from becoming soggy?
To avoid sogginess, let ingredients cool a bit before assembling. Use fresh ingredients and don’t overdo the sauce. If you’re meal prepping, keep wet ingredients separate and assemble just before eating.
Are these wraps freezer-friendly?
Yes, they freeze well! Wrap each wrap in foil or plastic wrap, then bag them in a freezer-safe bag. They’ll last up to 2 months. Thaw in the fridge overnight and reheat in a skillet or oven for the best taste.
What are some quick protein alternatives to chicken?
Quick protein options include pre-cooked rotisserie chicken, canned chicken, grilled shrimp, sliced steak, or pulled pork. Each can add a unique flavor to your cheesy garlic wraps.
How can I make these wraps healthier?
For a healthier version, use whole grain tortillas and lean chicken breast. Use less cheese, add lots of fresh veggies, and choose a lighter garlic sauce made with Greek yogurt.
Can I prepare these wraps in advance for meal prep?
Definitely! Prep the chicken, sauce, and veggies separately and store them. Assemble the wraps just before eating to keep them fresh and tasty.